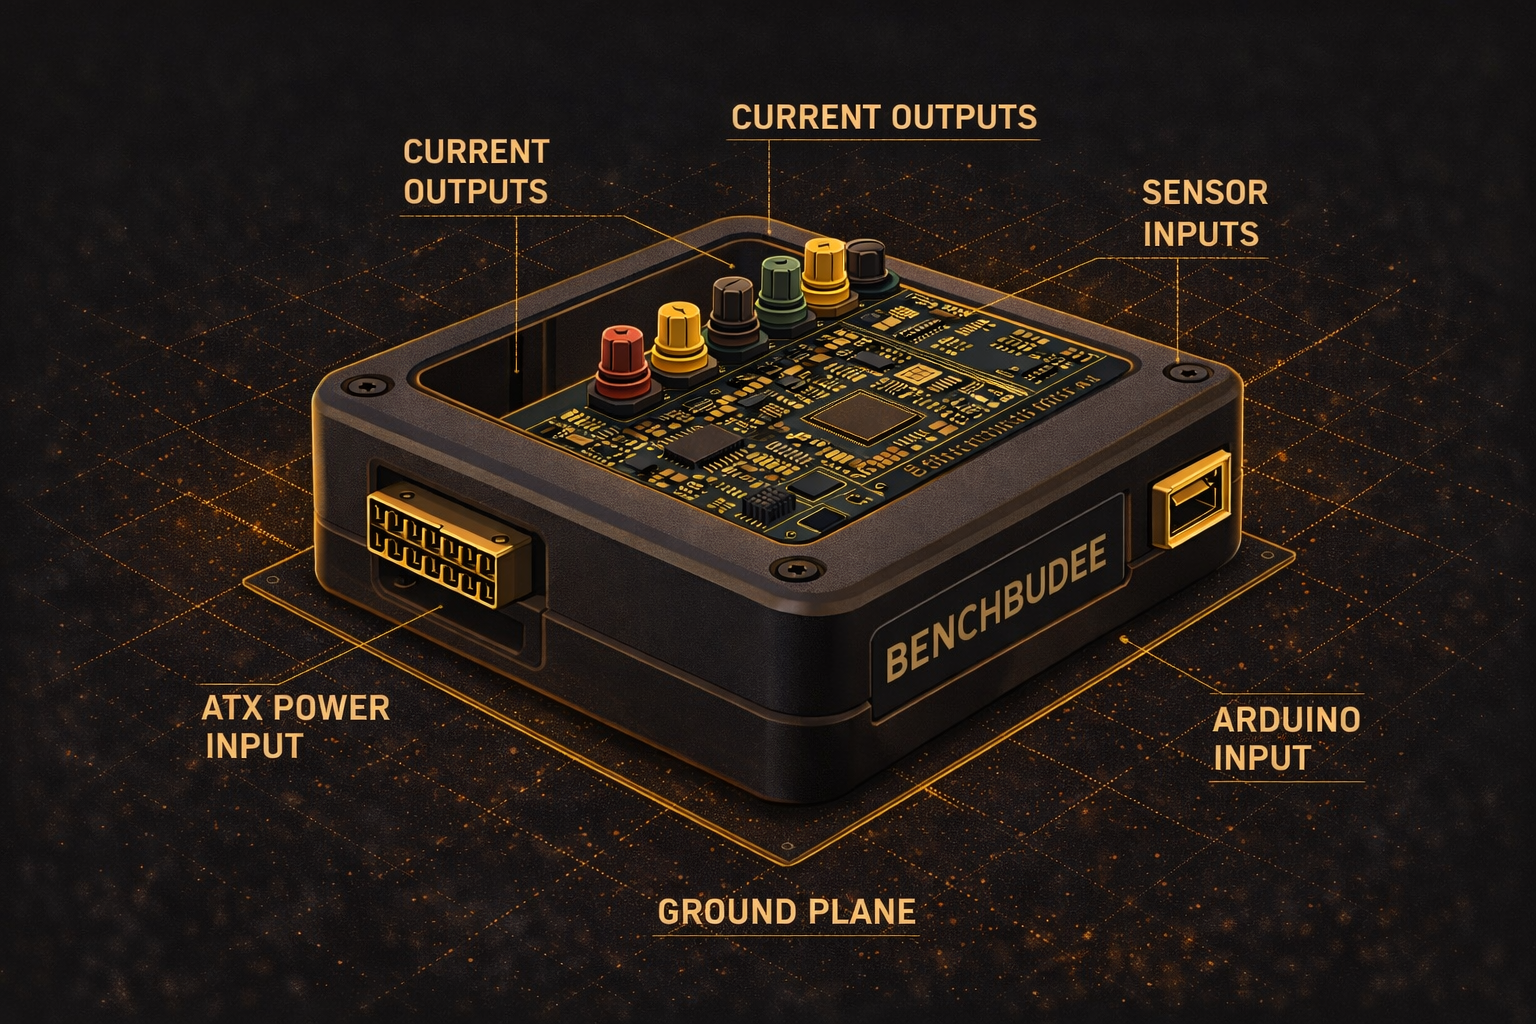
Contextual Electronics
Courses Book Podcast Blog Forum
Log In Start Building
Courses Book Podcast Blog Forum Log In

Course Navigation

  • Introduction
    • Session 1A Welcome
    • Intro To Week 1
    • There WILL Be Cuts And Jumps
    • What's All This Chris Gammell Stuff, Anyhow?
    • The role of off the shelf development boards
    • Navigating ContextualElectronics.com
    • Revision Control and GitHub
    • Check In On Your Background - Capacitors
    • Check In On Your Background - Diodes
    • Check In On Your Background - Inductors
    • Check In On Your Background - Op Amps
    • Check In On Your Background - Resistors
    • Check In On Your Background - Transistors
    • Check In On Your Background - Voltage/Current/Power
    • Check In On Your Background - Summary
    • The Importance and Role of Failure *
    • Viewing Others' Work *
    • KiCad Proficiency
  • Early Conceptualization
    • Intro To Week 2
    • Early Conceptualization
    • What We'll Be Designing
    • Design Constraints *
    • Mechanical Constraints *
    • Low Cost Design Considerations *
    • Choosing Solderable Components *
    • Swapability Of Components
    • Temperature Considerations
    • More About GitHub
    • Block Diagramming
    • Project Creation *
    • Creating A Schematic Skeleton *
    • Defining Your Inputs and Outputs
    • An Early Design Change
  • Understanding The Modules
    • Intro to Week 3
    • Modular Design
    • Understanding The Thermocouple Module *
    • Understanding The Current/Fan Driver Module *
    • Understanding The Relay Module *
    • Understanding The Power Protection And Filtering Module *
    • Understanding The Power Control, Conditioning And Monitoring Module *
    • Understanding The LED Driver Module *
    • Understanding The Arduino Module *
    • Revisiting The Current/Fan Module *
    • The Reality Of Design
  • Part Selection
    • Intro To Week 4
    • Part Selection
    • Paper Prototyping
    • Choosing Components For The Thermocouple Module *
    • Reading Op Amp Datasheets
    • Reading ADC Datasheets
    • Choosing Components For The Current/Fan Driver Module *
    • Reading DAC Datasheets
    • Reading MOSFET Datasheets
    • Choosing Components For The Relay Module *
    • Reading Relay Datasheets
    • Reading Diode Datasheets
    • Choosing Connectors *
    • Choosing Components For The Power Protection And Filtering Module *
    • Choosing Components For The Power Control, Conditioning, Monitoring Module *
    • Choosing Components For The LED Driver Module *
    • Thermocouple Circuit Simulation
    • Intro To The Layout
  • Association and Placement
    • Introduction to Week 5
    • The Importance of Checking Footprints
    • Associating and Placing the Relay Module *
    • Line Power Design Considerations
    • Associating and Placing the Thermocouple Module *
    • Associating and Placing the Terminal/ATX Blocks *
    • Associating and Placing the Arduino Module
    • Associating and Placing the Current/Fan Driver Module *
    • Associating and Placing the Power Protection and Filtering Module *
    • Associating and Placing the Power Modification Module *
    • Associating and Placing the LED Driver Module *
    • Benefits of a Ground Plane
    • Finalizing The System Part Placement
  • Beginning Layout
    • Intro to Week 6
    • Ground and Power Planes
    • Reality Check
    • Layout Work Session 1
    • Checking Out The Components
    • Layout Work Session 2
    • Layout Work Session 3
    • Layout Work Session 4
    • Layout Work Session 5
    • Layout Work Session 6
    • Layout Work Session 7
  • Continuing Layout
    • Intro To Week 7
    • Layout Work Session 8
    • Connecting Ground Planes
    • Layout Work Session 9
    • Layout Work Session 10
    • Layout Work Session 11
    • Layout Work Session 12
    • Layout Work Session 13
    • Layout Work Session 14
  • Finishing Layout
    • Layout Work Session 18
    • Analog IO Cleanup/Additions
    • Changes after external DFM
    • BenchBudEE Version Sent To Fab
    • Layout Work Session 15
    • Layout Work Session 16
    • Layout Work Session 17
  • Finding Replacements And Ordering Parts
    • Session 1B Welcome
    • Equipment Needs
    • Parts Intro
    • BOM Review
    • Locality Problems
    • Introduction To Drop In Replacements
    • Second Sourcing Components Session 1
    • Second Sourcing Components Session 2
    • Second Sourcing Components Session 3
    • Choosing Passive Values Session 1
    • Choosing Passive Values Session 2
    • Choosing Passive Values Session 3
    • Ordering Parts - Active Components
    • Ordering Parts - Passive Components
    • Reviewing The Order
    • Switching The Switcher
    • Fixing The Git Repository
    • How Many Parts Should You Buy?
    • Groups And Build Logs
  • Learning About Test Equipment
    • Week 2 Welcome
    • Part Unboxing
    • Introduction to the Aoyue 937
    • Introduction to the Gabotronics Xminilab
    • Introduction to the EX330
    • Continuity Testing The PCB
    • Build Log Uploads
    • Week 2 Hangout
  • Receiving Parts And Early Testing
    • Week 3 Welcome
    • Soldering Practice
    • ATX Connector
    • Switch Install and Troubleshooting
    • Build More Than One
    • Remainder of Power Section
    • Testing PTC Thermistors
    • PTC Datasheet Review
    • Adjustable Power Section
    • Installing Terminal Blocks
    • Week 3 Hangout
    • Makeshift Screwdriver
    • Load Testing The Adjustable Supply
    • Testing AC Characteristics Of The Adjustable Supply
    • Fixed Regulator Assembly
    • PTC Stacking
  • Beginning Assembly
    • Intro To Week 4
    • Installing The Opto
    • Adding An LED
    • Relay Simulation
    • Relay Build and Test
    • More Relay Testing
    • Creating a portable lab
    • Op Amp Install
    • Op Amp Testing
    • Op Amp Range Simulation
    • Current Source Assembly
    • Week 4 Hangout
  • More Assembly
    • Week 5 Welcome
    • Pull Down Resistor Sketchplanation
    • Current Source Testing
    • Installing Arduino Pins
    • Testing Arduino Power On
    • Drag Soldering
    • Package Announcement and Tryout
    • DAC construction
    • Hooking The Arduino To The Relay
    • Odd Power Behavior
    • Replacing A Soldering Iron Tip
    • SPI Pin Swap
    • Power Diode Bodge
    • SPI Library Intro
  • Beginning Testing
    • DAC Test Program
    • DAC SPI Troubleshooting
    • Fixing The DAC Program
    • Changing The SPI Characteristics
    • Re-testing The DAC
    • Part Removal
    • Flush Cut Style (FCS) MCP3901
    • Practice Soldering The FCS MCP3901
    • PWM Test Program
    • PWM Testing
    • Soldering Down The MCP3901
    • Missing MCP3901 Crystal
    • Final Shopping
    • Power Monitoring
    • Week 6 Hangout(s)
  • More Assembly And Early Troubleshooting
    • Week 7 Welcome
    • Q3 Testing
    • Fan PWM
    • Final Unboxing
    • MCP3901 External Assembly
    • LMT84 Assembly and Test
    • An Intro To The MCP3901 Datasheet
    • Register RW Test Code
    • Week 7 Hangout
    • MCP3901 Initial Code Testing
    • Rail Touch-up
    • Hot Air Part Replacement
    • MCP3901 SPI Bus Troubleshooting
    • Uninitiated Variables
    • MCP3901 Initial Capture
  • Final Troubleshooting And Code
    • Week 8 Welcome
    • LED Driver Assembly
    • Reference Ground Connect
    • ADC Jumper Attach
    • LED PWM Test Program
    • LED PWM Troubleshooting
    • Boost Converter Sketchplanation
    • Module Interaction Testing
    • Inductor and PTC Replacement
    • Week 8 Hangout
  • Firmware Continuation
    • Intro to Epilogue
    • Troubleshooting ADC Accuracy Part 1
    • Troubleshooting ADC Accuracy Part 2
    • 24 bits and OSR change

Back to All Courses

The BenchBudEE

The BenchBudEE

Lessons

  • Introduction
  • Early Conceptualization
  • Understanding The Modules
  • Part Selection
  • Association and Placement
  • Beginning Layout
  • Continuing Layout
  • Finishing Layout
  • Finding Replacements And Ordering Parts
  • Learning About Test Equipment
  • Receiving Parts And Early Testing
  • Beginning Assembly
  • More Assembly
  • Beginning Testing
  • More Assembly And Early Troubleshooting
  • Final Troubleshooting And Code
  • Firmware Continuation
YouTube LinkedIn About

© 2025 Contextual Electronics (Analog Life, LLC). Built with Eleventy.